In this part we will continue to build our Todo Application using storyboard.
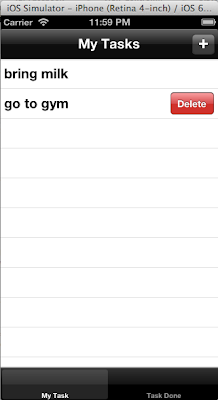
In our previous part we created a simple Tab Bar based application with two tabs, each having a tableView in it to hold our task list and our done task.


Your AddTaskViewController.h should look like this, add necessary codes.
We have added a NSMutableArray *MyTaskList to hold my task.
In your MyTaskViewController.m we will implement the protocol function, our table view delegate functions.
#pragma mark ---------------- <AddTaskViewControllerDelegate> Methods
- (void)AddTaskViewControllerDidDone:(AddTaskViewController *)controller taskAdded:(NSString *)task
{
[self.MyTaskList addObject:task];
}
And we are done.

The complete code for our Todo Application, where you can see your done task too in the second tab is here on Github
In our previous part we created a simple Tab Bar based application with two tabs, each having a tableView in it to hold our task list and our done task.
Introduction to Segues
Segue defines navigation in your Storyboard. It indicates how to get from one point to another. You usually create a segue by picking an event source(can be a button or a tableView cell) and choosing a scene to transition to.
We can also choose the type of animation we want to use. All apple built-in animations are available for us to use by making some simple clicks. Additionally we can even create our own custom animations for custom segues.
Lets quickly use segues in out simple Todo application.
Select the root folder in the project explorer, right click and select New file.
Select Objective-C class file and name it as AddTaskViewController.
Now go to your storyboard and drag a new View Controller to it.
Add a textField to it.

Now lets link this View Controller to our AddTaskViewController class file, go to the identity inspector and in the class choose AddTaskViewController.
(If you feel any problem here, refer part-I of this tutorial)
We want our Add task screen to be opened when I I click on the add button on My Task screen. Here we will create a segue which will make this job super simple.
On your My Task screen, select the add button and Ctrl+click and drag it to the Add Task screen, select push from the black modal window.

Select the segue and in the attribute inspector give this segue an Identifier, it will distinguish one segue form another.
We name our segue Identifier as AddTask.
So to open a screen with segue is just simple as that.
now we have added our Add task also which was the last screen for our Application.
Now to show another screen with segue Storyboarding comes with an API. A method called prepareForSegue:sender: on every UIViewController, and it is intended to be overridden. We can write our own code here that will take effect whenever each segue fires.
So in your MyTaskViewController.m we will add this method
- (void) prepareForSegue:(UIStoryboardSegue *)segue sender:(id)sender
{
if ([[segue identifier] isEqualToString:@"AddTask"]) {
[[segue destinationViewController] setDelegate:self];
}
}
#import <UIKit/UIKit.h>
@protocol AddTaskViewControllerDelegate;
@interface AddTaskViewController : UIViewController<UITextFieldDelegate>
@property(weak,nonatomic)id<AddTaskViewControllerDelegate >delegate;
@property (strong, nonatomic) IBOutlet UITextField *AddTaskTextField;
@property(nonatomic,strong)NSString *taskAdded;
@property (weak, nonatomic) IBOutlet UIView *addView;
- (IBAction)closeModal:(id)sender;
@end
@protocol AddTaskViewControllerDelegate <NSObject>;
-(void)AddTaskViewControllerDidDone: (AddTaskViewController *) controller taskAdded:(NSString *)task;
@end
Here we have created a protocol AddTaskViewControllerDelegate and this protocol implements a function AddTaskViewControllerDidDone.
In your AddTaskViewController.m Add these two functions
- (IBAction)closeModal:(id)sender
{
[self dismissViewControllerAnimated:YES completion:nil];
}
#pragma mark ---- <UITextFieldDelegate> Methods
- (BOOL)textFieldShouldReturn:(UITextField *)textField
{
// the user pressed the return, so dismiss the keyboard
self.taskAdded = textField.text;
[self.delegate AddTaskViewControllerDidDone:self taskAdded:taskAdded];
[textField resignFirstResponder];
return YES;
}
In our MyTaskViewController class we will use this protocol.
Now your MyTaskViewController.h should look like this-
#import <UIKit/UIKit.h>
#import "AddTaskViewController.h"
@interface MyTaskViewController : UIViewController<UITableViewDelegate,UITableViewDataSource,AddTaskViewControllerDelegate>
@property (weak, nonatomic) IBOutlet UIBarButtonItem *AddTask;
@property (strong, nonatomic) IBOutlet UITableView *TaskListTable;
@property (nonatomic, strong) NSMutableArray *MyTaskList;
@end
We have added a NSMutableArray *MyTaskList to hold my task.
In your MyTaskViewController.m we will implement the protocol function, our table view delegate functions.
#pragma mark ------------- <UITableViewDelegate> Methods------------------
- (NSInteger)numberOfSectionsInTableView:(UITableView *)tableView
{
return 1;
}
- (NSInteger)tableView:(UITableView *)tableView numberOfRowsInSection:(NSInteger)section
{
return [self.MyTaskList count];
}
- (UITableViewCell *)tableView:(UITableView *)tableView cellForRowAtIndexPath:(NSIndexPath *)indexPath
{
static NSString *CellIdentifier = @"Cell";
UITableViewCell *cell = [tableView dequeueReusableCellWithIdentifier:CellIdentifier];
if (cell == nil) {
cell = [[UITableViewCell alloc] initWithStyle:UITableViewCellStyleDefault reuseIdentifier:CellIdentifier];
}
NSString *task = [self.MyTaskList objectAtIndex:indexPath.row];
cell.textLabel.text = [NSString stringWithFormat:@"%@",task];
return cell;
}
- (void)tableView:(UITableView *)tableView commitEditingStyle:(UITableViewCellEditingStyle)editingStyle forRowAtIndexPath:(NSIndexPath *)indexPath
{
if (editingStyle == UITableViewCellEditingStyleDelete)
{
[self.MyTaskList removeObjectAtIndex:indexPath.row];
[tableView deleteRowsAtIndexPaths:[NSArray arrayWithObject:indexPath] withRowAnimation:UITableViewRowAnimationFade];
}
}
- (void)tableView:(UITableView *)tableView didSelectRowAtIndexPath:(NSIndexPath *)indexPath
{
UIAlertView *confirmTaskDone = [[UIAlertView alloc]initWithTitle:[self.MyTaskList objectAtIndex:indexPath.row] message:@"Choose Action" delegate:self cancelButtonTitle:@"Cancel" otherButtonTitles:@"Done", nil];
currentRow = indexPath.row;
[confirmTaskDone show];
}
AddTaskViewControllerDelegate Method
#pragma mark ---------------- <AddTaskViewControllerDelegate> Methods
{
[self.MyTaskList addObject:task];
[self resignFirstResponder];
[self dismissViewControllerAnimated:YES completion:nil];
[self.TaskListTable reloadData];
And we are done.


The complete code for our Todo Application, where you can see your done task too in the second tab is here on Github
Thanks, happy Storyboarding.. :)
Indeed a useful post !!! Alas !! Looks like I need to learn iOS now !!!
ReplyDelete